

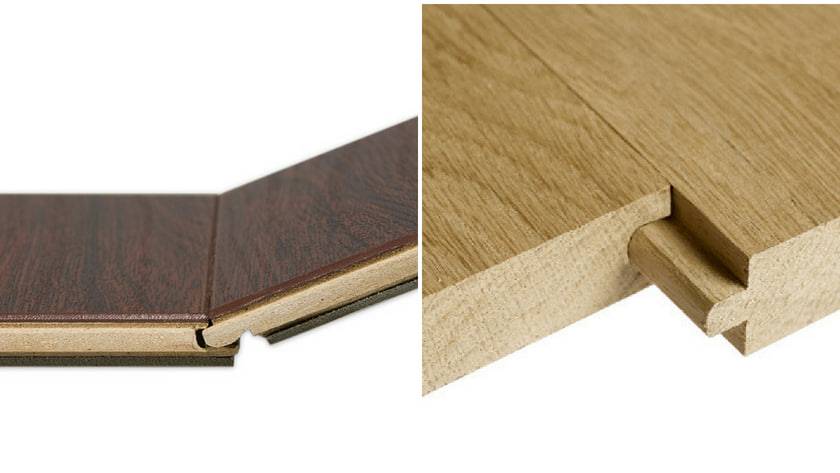
Imagine a flooring system that blends impressive strength with a surprisingly simple installation method. Enter tongue and groove flooring, a timeless invention that utilizes ingeniously designed planks to create seamless, durable surfaces. These planks, like puzzle pieces, possess a protruding edge (tongue) on one side and a recessed channel (groove) on the other. The magic happens when the tongue of one plank effortlessly slides into the groove of its neighbor, forming a secure and unified floor.
But the story of tongue and groove extends beyond convenience. This joining method, used for centuries, offers a level of flexibility crucial for wood flooring. As wood naturally expands and contracts with fluctuations in humidity, the slight horizontal movement allowed by the tongue and groove system prevents warping and cracking, ensuring your floor maintains its beauty for years to come.
The application of this clever technique goes beyond just wood flooring. Tongue and groove is a versatile solution employed in various materials like wall paneling and wainscot, ensuring a tight and refined finish wherever a seamless connection is desired.
The invention of the side matcher, a specialized machine, paved the way for mass production of tongue and groove floorboards, significantly increasing their accessibility and popularity.
Balancing Strengths and Weaknesses: Tongue and Groove Flooring
Tongue and groove flooring, while boasting several appealing features, also carries some inherent limitations. Let’s delve into both sides of the coin:
Advantages:
- Seamless Connections: The tongue and groove design ensures tight seams, minimizing the need for excessive nailing or gluing for secure installation.
- Enhanced Water Resistance: With proper sealant application, particularly on site-finished floors, tongue and groove systems can offer improved water resistance compared to unfinished alternatives.
- Cost-Effective Choice: Compared to other flooring options, materials and installation methods for tongue and groove flooring tend to be more affordable due to the absence of complex manufacturing processes or patented technologies.
Disadvantages:
- Installation Challenges: Precise alignment and fitting of the tongue into the groove can be demanding, especially if the wood becomes warped or swollen due to moisture fluctuations.
- Susceptibility to Breakage: The delicate tongues can break during installation if not handled with utmost care, potentially requiring replacement boards.
- Limited Reusability: Dismantling a tongue and groove floorboard is often difficult, if not impossible, without causing significant damage, making it a less ideal choice if future modifications or repairs are anticipated.
Navigating the Flooring Maze: Tongue and Groove vs. Lock and Fold
Selecting the optimal flooring solution requires considering various factors, including the installation method. This guide explores the two major contenders: tongue and groove and lock and fold (click lock).
Tongue and Groove:
- Installation: This traditional method utilizes boards with a protruding tongue that fits into a recessed groove along the side of the adjoining plank.
- Fastening: To ensure stability, the boards are often secured with glue, nails, or staples that attach them directly to the subfloor.
- Suitability: Tongue and groove systems excel in permanent installations due to their sturdiness.
Lock and Fold:
- Installation: This faster and simpler method, prevalent in laminate and engineered wood flooring, employs interlocking mechanisms. The planks come with pre-designed tongues and grooves that snap together at an angle and then fold down to secure the connection.
- Fastening: No glue, nails, or staples are needed, as the interlocking mechanism creates a floating floor that rests on the subfloor without direct attachment.
- Benefits: Lock and fold systems offer easier disassembly for repairs or replacements and exhibit reduced horizontal movement compared to classic tongue and groove, potentially minimizing warping and gapping.
Ultimately, the choice between these two methods depends on your specific needs and priorities. Consider factors like desired permanence, ease of installation, potential for future modifications, and budget, while keeping in mind the strengths and limitations of each option.
Mastering the Tongue and Groove: A DIY Installation Guide
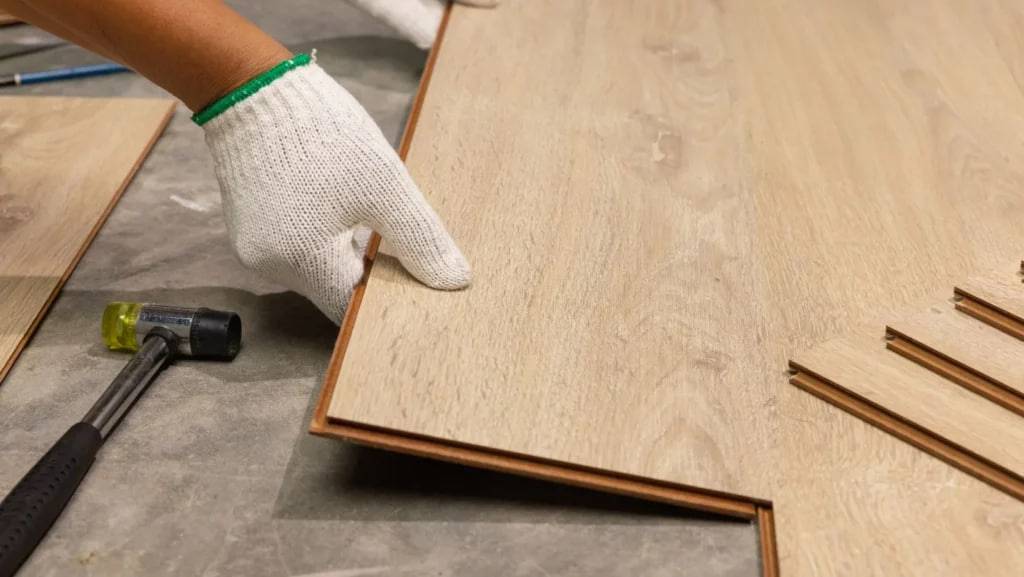
Installing tongue and groove flooring offers a sense of accomplishment and the satisfaction of creating a beautiful, durable surface in your home. Here’s a breakdown of the process to empower you to tackle this project:
Securing the Floorboards:
You have the choice of fastening, gluing, or a combination of both to secure the tongue and groove floorboards. While nails offer superior strength, especially for thicker tongues, floor staples present two advantages:
- Reduced Splitting Risk: Staples exert less pressure on the wood, minimizing the chance of splitting the planks.
- Enhanced Stability: Each staple has two prongs, providing increased stability compared to a single nail.
Preparing the First Row:
- Shimming: Install the first row of boards along the wall, using shims to create a consistent expansion gap around the edges. This gap accommodates natural wood movement and will be concealed by the base trim.
- Fastening: Utilize a flooring nailer or stapler to drive the fasteners through the tongue of each board, not the face. This ensures a seamless and aesthetically pleasing finished product.
Choosing the Right Tools:
- Flooring nailer or stapler: Select the appropriate tool based on your chosen fastening method and board thickness.
- Nails or staples: Ensure compatibility with your chosen nailer/stapler and board thickness.
Following Manufacturer’s Guidance:
- Spacing: Always refer to the specific spacing recommendations provided by the flooring manufacturer for nails or staples to achieve optimal results.
By following these steps and carefully considering your options, you’ll be well on your way to achieving professional-looking tongue and groove flooring that adds value and beauty to your space. Remember, if you’re unsure about any aspect of the process, consulting a professional is always recommended.
The Best Floor for Your Needs By Dex Flooring

Tongue and groove flooring offers a compelling blend of classic elegance, enduring strength, and surprising ease of installation. Whether you’re drawn to its seamless connections, enhanced water resistance, or cost-effective nature, this versatile solution promises to elevate your space for years to come.
However, navigating the world of flooring options can be overwhelming. If you’re seeking expert guidance and top-quality materials to bring your tongue and groove vision to life, look no further than Dex Flooring. Our team of flooring specialists boasts extensive experience and a deep understanding of tongue and groove installation, ensuring you achieve a flawless and long-lasting result.
Visit Dex Flooring today or contact us to explore our extensive selection of tongue and groove flooring options and let us help you transform your dream floor into a beautiful reality.
Tongue and Groove Flooring FAQs
Is tongue and groove flooring difficult to install myself?
Tongue and groove flooring can be installed DIY, but it requires careful planning and execution. While the basic concept is straightforward, achieving a professional-looking finish demands meticulousness and attention to detail. If you’re unsure about your DIY skills or prefer a guaranteed outcome, consider consulting a professional flooring installer.
What tools do I need to install tongue and groove flooring?
The essential tools include:
- Flooring saw or miter saw for cutting boards
- Flooring mallet for tapping planks into place
- Pull bar for securing tight joints
- Flooring nailer or stapler (optional, depending on chosen fastening method)
- Tape measure, level, and pencil for marking and measuring
What type of subfloor is suitable for tongue and groove flooring?
The subfloor should be level, smooth, clean, and dry. Common suitable subfloor materials include plywood, oriented strand board (OSB), and concrete, although proper preparation might be required depending on the specific subfloor type.
How long does it take to install tongue and groove flooring?
The installation time varies depending on the project size, your experience level, and any unforeseen complications. As a general guideline, allow a full day for a small room and several days for larger areas.
How do I care for and maintain my tongue and groove flooring?
Regular sweeping, vacuuming, and mopping with a wood floor cleaner is recommended. Avoid using harsh chemicals or excessive water, as this can damage the finish. Applying a protective coating periodically can further enhance the longevity of your floor.
Can I refinish tongue and groove flooring if it gets scratched or worn?
Yes, depending on the type of finish and the severity of the damage. Solid hardwood floors can typically be sanded and refinished multiple times, while engineered wood and laminate flooring options have limited refinishing possibilities. Consult the manufacturer’s recommendations for specific care and refinishing instructions.