
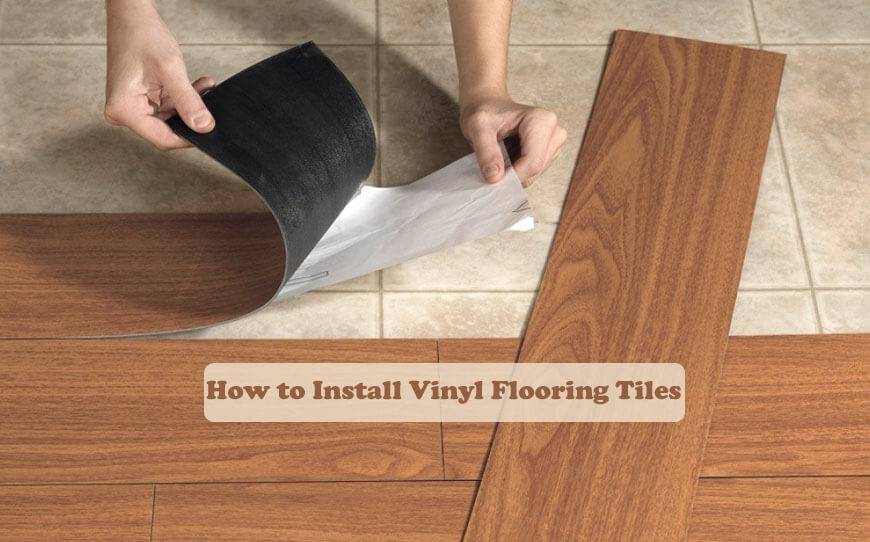
Thinking of sprucing up your floors with beautiful, durable vinyl tiles? This guide will walk you through the general process of how to install vinyl flooring tiles (LVT), so you can achieve a professional-looking finish.
But before we dive in, remember this: Installation details can vary depending on your specific floor and room. Always refer to the manufacturer’s instructions for the most accurate steps. (Pro tip: Vinyl tiles are installed differently than sheet vinyl, so be sure you’ve got the right product!)
Dex Flooring now offers expert vinyl, laminate, wood floor fitting nationwide! Get a free quote today: +61 483 224 831
Installing Your Luxury Vinyl Tile (LVT) Floor
Ready to transform your space with beautiful and durable LVT flooring? Here’s a step-by-step guide to help you achieve a professional finish, even if you’re a DIY enthusiast.
Preparation is Key:
- Acclimatization: LVT tiles need to adjust to the room’s temperature and humidity before installation. Leave them unopened in the room for 48 hours at a normal temperature.
- Subfloor Superstar: A clean and level subfloor is crucial. Sweep, vacuum, and wash the floor thoroughly, allowing it to dry completely. Unevenness can show through the finished LVT, so check for dips or bumps. Resources like Polyflor’s subfloor prep guide (search online) can be helpful.
- Kneel in Comfort: Installing LVT involves a lot of kneeling. Invest in padded knee pads to save your knees from fatigue and pain.
Creating a Flawless Layout:
- Center Stage: Aim for a symmetrical floor by starting in the center. Measure the room’s width and length, and mark the center point with intersecting chalk lines.
- L-Shaped Guide: For a visual reference, lay two rows of tiles at right angles (forming an “L”) starting from the center. Leave them loose for now. This helps you check alignment with the walls and adjust if needed.
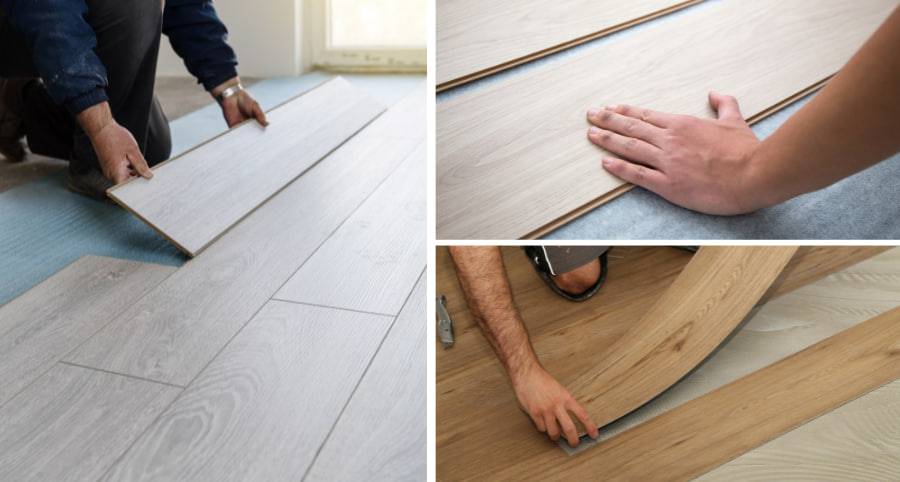
Installation Techniques
Locking System:
- Follow the manufacturer’s instructions for clicking the tiles together. Ensure a tight fit at each connection.
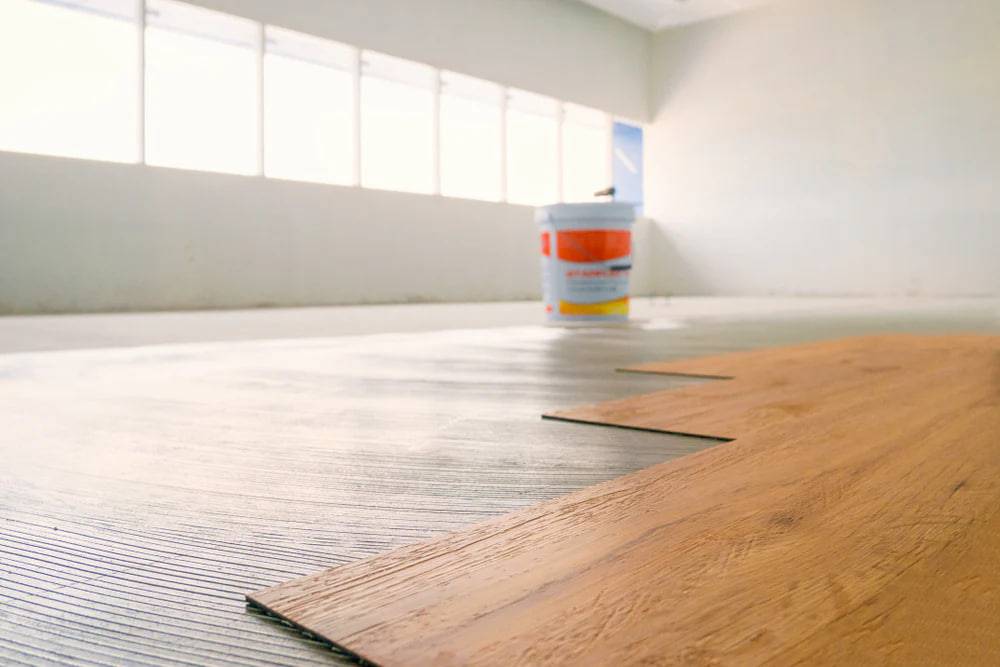
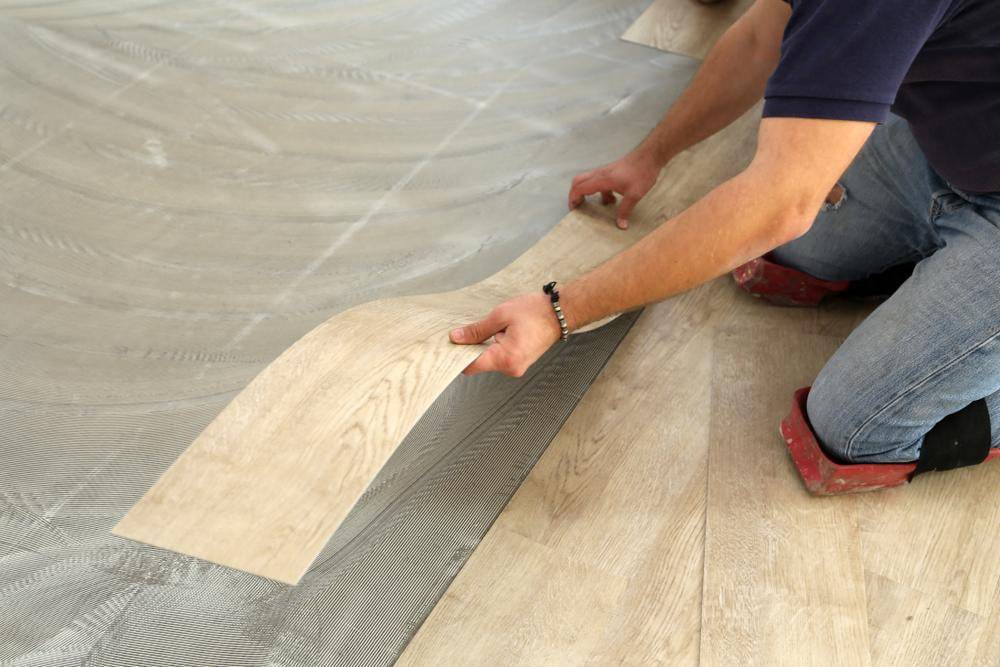
Glue Down:
- Adhesive Application: Once your tiles are positioned, follow the manufacturer’s recommendation for adhesive. It might involve peeling a backing or applying a thin layer of glue with an A2 spreader.
- Sticking it Down: Work in sections, starting from the center. Firmly press down on the tiles after applying adhesive and roll them with a floor roller for a secure bond.
- Cleaning Up: If adhesive oozes out during installation, you’re likely using too much. Wipe away excess with a damp cloth immediately.
Cutting and Fitting:
- As you reach the walls, you’ll need to cut tiles for precise fit. Here’s a pro tip:
- Lay a full tile on top of another already installed tile.
- Place a third tile on top, touching the wall.
- Use the edge of the third tile to mark a cutting line on the second tile.
- Cutting: Use a sharp utility knife to score the tile along the line, then carefully snap it along the score mark.
Remember:
- When kneeling on newly laid tiles, use a piece of plywood or a knee pad to distribute your weight and prevent tiles from moving.
- For detailed instructions and specific recommendations, always refer to the manufacturer’s guide for your LVT flooring.
With these steps and a little patience, you’ll be well on your way to a beautiful and functional LVT floor!
Choosing the Best LVT Installation Method
Not all LVTs are created equal! When it comes to installation, you’ll have three main options, each with its own pros and cons. Let’s explore these methods to help you find the perfect fit for your project:
1. Locking System Vinyl:
- Effortless Installation: This DIY-friendly method features interlocking planks that click together for a fast and easy assembly. It’s like building with giant puzzle pieces!
- Underlay Advantage: Locking systems require an underlayment for support, which can help with minor subfloor imperfections. This means less prep work for you!
- Design Limitations: While beautiful wood and tile designs are available, locking systems may have fewer customization options compared to glue-down LVT.
- Future Flexibility: Locking systems can be disassembled if needed, making them a good choice for temporary installations or renters.
- Conservatory Considerations: Due to potential expansion and movement, locking systems might require a wider expansion gap in sunrooms.
2. Glue-Down Vinyl:
- Professional Touch: This method involves adhering the tiles directly to the subfloor with adhesive. For a flawless finish, a perfectly flat, even subfloor is crucial. We recommend professional installation for this method.
- Design Dreams Come True: Glue-down LVT offers the most design freedom! Our wide range of design strips and borders allows you to personalize your floor and create stunning effects like realistic tile grout lines.
- Firm Footing: Some people prefer the feel of glue-down LVT, finding it more solid underfoot.
3. Looselay Vinyl:
- Lightning-Fast Installation: This is the easiest method, with specially designed backing that grips most flat, even subfloors without needing glue or underlay.
- Easy Maintenance & Repair: Looselay LVT is simple to keep clean and repair if needed.
- Future Flexibility: Like locking systems, looselay tiles can be lifted and replaced if necessary.
- Design Decisions: Similar to locking systems, design options might be limited with looselay LVT. However, it excels in offering built-in acoustic backing for sound reduction and boasts eco-friendly features like 100% recyclability.
The Takeaway:
Ultimately, the best LVT installation method depends on your priorities. Consider your design preferences, DIY skills, subfloor condition, and budget.
Do you crave a customized look with maximum design options? Glue-down might be your match. Prioritizing speed and ease of installation? Locking or looselay could be perfect. We’re here to help you find the ideal LVT solution for your project!
Conclusion
So there you have it! With a better understanding of LVT installation methods, you’re well on your way to creating a beautiful and functional floor in your home. Remember, the best choice depends on your specific needs and preferences. Don’t hesitate to reach out to us if you have any questions or need help selecting the perfect LVT for your project. We’re here to guide you every step of the way!
FAQs
Which LVT installation method is easiest for DIY?
Locking system LVT is generally considered the easiest to install yourself. The click-together mechanism makes assembly straightforward, and the underlayment can help compensate for minor subfloor imperfections.
I’m renting, what’s the best LVT option?
Locking system or looselay LVT might be ideal for renters. Both can be disassembled and potentially reused elsewhere, minimizing damage to the subfloor.
How can I ensure a professional-looking LVT installation?
For a flawless finish, especially with glue-down LVT, consider hiring a professional installer. Professionals have the experience and expertise to ensure a perfectly level subfloor and a seamless LVT application.
What tools do I need to install LVT flooring myself?
The tools required depend on the installation method. Typically, you’ll need a utility knife, tape measure, straight edge, tapping block, and possibly a rolling pin. Locking systems might require a specific locking tool.
How long does it take to install LVT flooring?
Installation time varies depending on the room size, chosen method, and your DIY experience. Locking systems and looselay LVT are generally quicker to install than glue-down options.
What type of subfloor is suitable for LVT installation?
The subfloor needs to be flat, dry, smooth, and structurally sound. Unevenness can telegraph through the LVT. Minor imperfections might be workable with locking systems, but glue-down LVT requires a perfectly level surface.
Do I need underlayment for all LVT installations?
Locking system LVT requires underlayment for support and to address minor subfloor issues. Glue-down and looselay LVT typically don’t require additional underlayment, but some manufacturers might recommend specific products for sound reduction or moisture protection.
How do I care for my newly installed LVT floor?
Regular sweeping or vacuuming and occasional mopping with a manufacturer-approved cleaning solution will keep your LVT floor looking beautiful for years to come. Avoid harsh chemicals and abrasive cleaners.
Is LVT flooring waterproof?
Many LVT options are 100% waterproof, making them ideal for kitchens, bathrooms, and laundry rooms. Always check the manufacturer’s specifications for your specific LVT product.
What are some common mistakes to avoid during LVT installation?
- Not properly acclimatizing the LVT tiles to the room temperature and humidity.
- Installing LVT on an uneven or unclean subfloor.
- Not using the correct underlayment for locking system LVT.
- Applying too much adhesive with glue-down LVT.
- Using the wrong cutting techniques or tools.