
Ditching your old linoleum flooring? While the process itself might be straightforward, it can definitely be a workout. This guide will walk you through the different scenarios you might encounter: squares, sheets, or linoleum with underlayment.
We’ll cover how to tackle each situation, from prying up the tiles to dealing with stubborn adhesive. And hey, if you get lucky and have linoleum with removable underlayment, we’ll show you how to skip the tedious scraping altogether!
Why Linoleum Is Difficult to Remove?
Ripping out old linoleum flooring can feel like a wrestling match. Here’s what makes it so tough:
- Rock-Solid Adhesives: Linoleum gets secured with powerful glues that harden over time, creating a nearly unbreakable bond with the subfloor.
- The Underlayment Labyrinth: Linoleum often comes with a backing of burlap or felt, and it might even be installed on top of a separate felt underlayment.
- Asbestos Threat: In older homes, the glues used with linoleum can contain asbestos, a hazardous material. If you suspect asbestos is present, stop immediately and call in a professional for safe removal.
Options for Removing Linoleum Flooring
The Freeze: Dry Ice Shattering
Looking for a (somewhat) mess-free approach? Dry ice might be your answer. Its extreme coldness (-100°F!) can freeze linoleum and its adhesive, making them brittle and easier to chip away. This method, a veteran in the flooring removal game, is particularly effective for linoleum tiles.
However, keep in mind: while dry ice won’t harm your hardwood subfloor (it evaporates!), it’s a slow and tedious process.
The Grind: Scraping and Sanding
Pry bars or flooring scrapers can be used to remove most of the linoleum. For stubborn adhesive remnants, a flooring drum sander can be a powerful ally. This method works well on both sheet and tile linoleum.
The Cover-Up: When Removal Isn’t Necessary
Not all heroes wear capes – sometimes, the best solution is simply covering the old linoleum. If you don’t have a specific reason for complete removal, like refinishing hardwood underneath, consider installing a new layer on top. Floating floors like laminate or luxury vinyl planks can often be installed directly over existing linoleum, as long as it’s stable and even.
Linoleum Removal Methods: What You’ll Need
| Method | Pros | Cons | What You’ll Need |
| Dry Ice Shattering | Clean, safe for subfloor (especially wood) | Slow, tedious | Dry ice, sheet plastic, old towels, insulated gloves, eye, hearing, and breathing protection, asbestos test kit |
| Scraping & Sanding | Fast, effective on sheet & tile | Messy, requires stronger tools | Floor scraper, pry bar, flooring drum sander (optional: orbital sander), 120 grit drum sander sandpaper, shop vacuum, eye, hearing, and breathing protection |
| Cover-Up | Quick, no removal needed (if subfloor is stable) | May not be your desired aesthetic | New flooring (laminate, vinyl planks), shop vacuum (optional) |
How to Remove Linoleum With Dry Ice?
- Target a small area: Begin at an edge and cover a 2ft x 2ft section of linoleum with plastic.
- Freeze and Shatter: Place dry ice (covering about 1ft²) on the plastic, leaving a border. Cover with towels for 2-3 minutes to freeze the linoleum and adhesive.
- Slide and Pry: While the next section freezes, use the insulated gloves to grab the plastic and slide the dry ice to a new area. Pry up the brittle linoleum with the pry bar.
- Repeat and Remove: Continue section by section, freezing, sliding the dry ice, and prying up the linoleum.
- Sanding the Rest (Optional): For a smoother finish, use the orbital sander (with appropriate dust collection) to remove remaining adhesive, felt, and burlap backing.
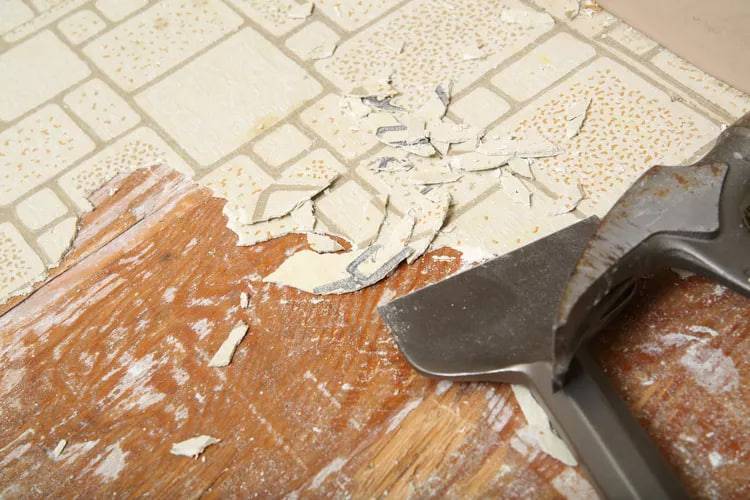
How to Remove Linoleum With a Scraper and Sander?
- Start at the Edges: Begin at a corner or edge of the linoleum flooring. If present, remove floor transitions (like metal strips) first.
- Pry and Pull: Slide the flat end of the floor scraper under the linoleum and pry upwards with force. The linoleum may come up in whole pieces or break off in smaller chunks.
- Conquer the Chunks: For larger pieces of adhesive or linoleum not removed by scraping, use the drum sander.
- Finishing Touches (Optional): If you desire a smoother surface, switch to the orbital sander with a finer grit sandpaper.
- Clean Up: Throughout the process, use the shop vacuum to control dust and debris.
Tips for Covering Linoleum
Thinking of ditching the removal and giving your old linoleum a new lease on life? Here’s how to cover it up seamlessly:
- Smooth Sailing: Ensure a flat surface for your new flooring by patching any uneven areas or cracks in the linoleum.
- Mind the Gap: Covering the linoleum will raise the floor level. Use floor reducer strips at doorways to create a smooth transition between the new floor and existing surfaces.
- Flooring Freedom: Unleash your creativity! Most floating or glued-down options work well on linoleum, including laminate, vinyl sheets or planks, and even tiles.
- Baseboard Boost: To accommodate the additional layer, remove your baseboards and reinstall them slightly higher.
- Doorway Do-Over: Undercut your door casings using an oscillating multi-tool or a manual pull saw for a perfect fit with the new floor.
When to Call a Professional at Dex Flooring?
Removing linoleum can be a battle, so don’t hesitate to call in reinforcements! Here are some situations where a professional is your best bet:
- Asbestos Alert: If you suspect asbestos in the adhesive, stop immediately! Call a certified asbestos abatement or remediation company to handle the removal safely.
- DIY Doubt: Even if you’re handy, linoleum removal can be tough. Feeling overwhelmed? Don’t be a hero! General contractors or large flooring companies have the experience and equipment to tackle the job efficiently.
- Rock-Solid Bond: If the linoleum lacks a felt underlayment and is cemented directly to the subfloor, it might be creating an unbreakable bond. Prying it up yourself could damage the wood floor underneath. Professionals have the tools and techniques to minimize damage during removal.