
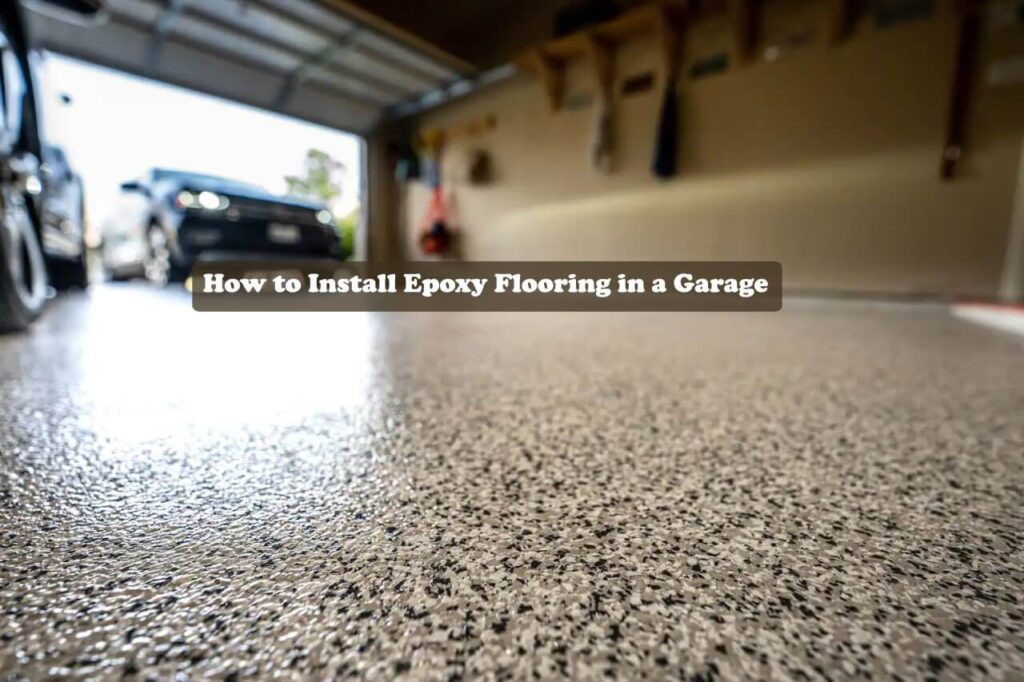
Give your garage floor a stunning and durable makeover with epoxy flooring! This easy-to-clean coating is a perfect choice for high-traffic areas like garages, basements, and workshops.
Unlike regular paint, epoxy forms a tough, seamless bond with concrete that resists scratches, chemicals, and even dropped tools. Plus, its non-flammable properties make it ideal for workshops.
Best of all, with proper care, your epoxy floor can last up to 20 years, transforming your space for decades to come.
Choosing the Perfect Epoxy for Your Garage Floor
Not all epoxy floor paints are created equal! These two-part resin wonders offer a spectrum of durability and application difficulty. Here’s a breakdown of the three main types to help you pick the right one for your garage:
- Solid Epoxy: The toughest and purest form, solid epoxy skips the solvents that evaporate during application. This translates to a super strong finish, but also a higher price tag and faster curing time. Due to its rapid hardening, professional installation is recommended.
- Solvent-Based Epoxy: A popular choice, solvent-based epoxies offer good adhesion and come in a vast array of colors. However, the downside is the strong solvent fumes. Proper safety gear like respirators is crucial for application. Remember, good ventilation and keeping people and pets away from the area are essential.
- Water-Based Epoxy: The environmentally friendly option! Water-based epoxies ditch the harsh solvents, making them ideal for DIY enthusiasts. Available at most hardware stores, they’re a gaining popularity for their user-friendliness.
Bonus Options:
- Pre-Tinted & Metallic Epoxy: Want a stylish twist? Pre-tinted and metallic epoxies create a unique aesthetic for your living areas or garage.
- Flake Systems: For a decorative touch, some epoxy systems include colored flakes that get scattered during application, resulting in a cool speckled pattern.
Epoxy Floors: A Few Things to Consider
While epoxy coatings are a fantastic upgrade for your floors, there are a few things to keep in mind:
- Prep Work is Essential: Unlike a quick wall paint job, epoxy requires meticulous surface prep. This includes thorough cleaning, patching cracks, and ensuring the concrete is completely dry (at least 55°F). Expect to dedicate at least a day to prep work, potentially longer for major repairs.
- Patience is a Virtue: Epoxy is a multi-day project. Each coat requires a curing time of at least 12 hours, with most projects needing two coats. Factor in at least two days for painting a typical garage floor.
- Temperature Matters: For optimal results, concrete should be bone dry and at least 55°F, with air temperatures between 60-90°F.
- Slick When Wet: Epoxy floors are known for their shine, which makes them easy to clean but also slippery when wet. Anti-skid additives can help improve traction.
- Surface Suitability: Not all concrete is created equal. Damp or previously sealed floors aren’t ideal candidates for epoxy. New concrete also needs to cure for at least 30 days before application.
- DIY vs. Pro: The professional installation cost can range from $3 to $12 per square foot, with a typical two-car garage costing $1,200 to $6,000. If you decide to hire a contractor, get multiple quotes, check references, and ask about their prep plan, epoxy type, and number of coats (ideally three layers of 100% epoxy with low VOCs).
Epoxy Floor Prep Arsenal: Must-Have Tools and Materials
Before diving into your epoxy floor transformation, gather your supplies! Here’s a breakdown of what you’ll need:
Tools:
- Demolition Crew: Flat-edge shovel or scraper for removing loose material
- Dust Buster: Shop vacuum to eliminate debris after scraping
- H2O Warrior: Garden hose for rinsing the concrete
- Scrub Master (Optional): Power scrubber with a brush attachment or a long-handled acid brush for tough spots
- Heavy-Duty Scrubber: Stiff-bristle brush for manual cleaning
- Water Wrangler: Rubber squeegee to remove excess water
- Sprinkler Savior: Plastic sprinkling can for applying acid (if needed)
- Mixing Maestro: Drill with a stirring bit for mixing the epoxy
- Detail Dudes: Paintbrushes for edges and corners
- Rolling in Style: 9-inch medium-nap roller and roller pole for smooth application
Safety First:
- Rubber Gloves: To protect your hands during cleaning and application
Materials:
- Epoxy Hero: Two-part epoxy paint (the star of the show!)
- Debris Catcher: Plastic bag for collecting debris while scraping
- Cleaning Champion: Cleaning/degreasing solution to remove dirt and grime
- Acid Attacker (Optional): 32% muriatic acid (handle with extreme caution, if necessary)
- Sealing the Deal: Duct tape for creating a sealed work area (optional)
DIY Epoxy Flooring: A Step-by-Step Guide
Thinking of giving your floors an epoxy makeover yourself? This guide will walk you through the process, but remember to always refer to the manufacturer’s instructions for your specific epoxy product first. Let’s get started!
Step 1: Prepping the Concrete Canvas
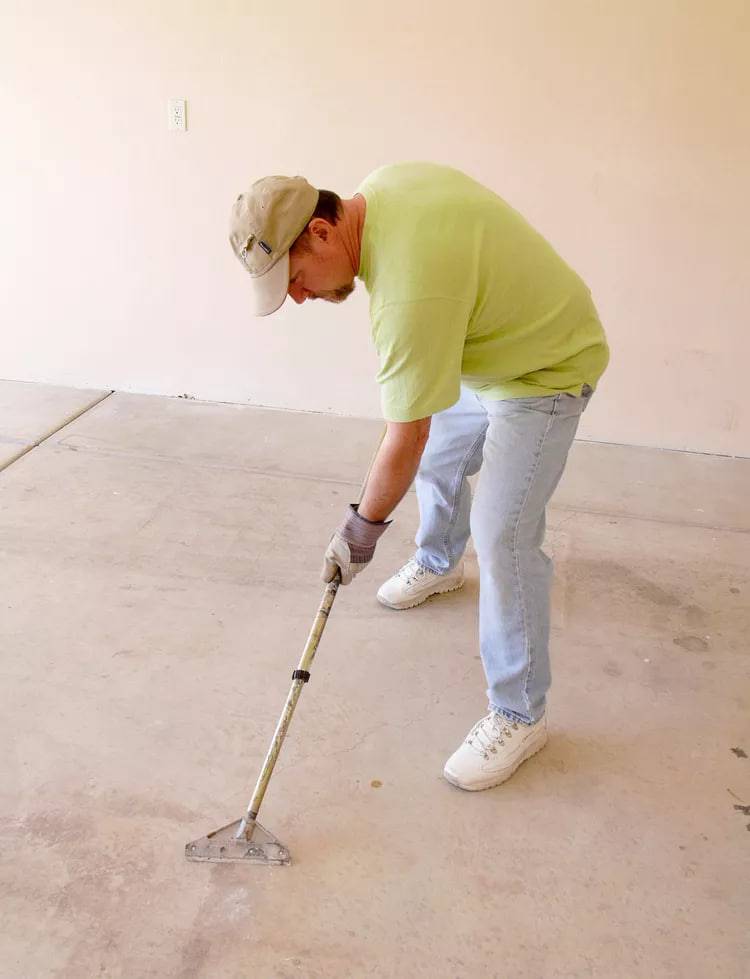
Before the epoxy magic happens, we need to prep the concrete surface for optimal adhesion. Here’s how:
- Clear the Clutter: Use a flat-edged shovel or scraper to remove any loose material or hardened debris.
- Suck Up the Dust: Once the big stuff is gone, grab your shop vacuum and eliminate any remaining dust and debris. A clean surface is key!
- Degrease Like a Boss: Prepare a cleaning/degreasing solution following the manufacturer’s instructions. Don your trusty rubber gloves and grab a stiff-bristle brush. Scrub the floor thoroughly, paying special attention to grease or oil stains.
Here’s an improved rewrite of step 2 on applying epoxy flooring:
Step 2: Mopping Up for Maximum Adhesion
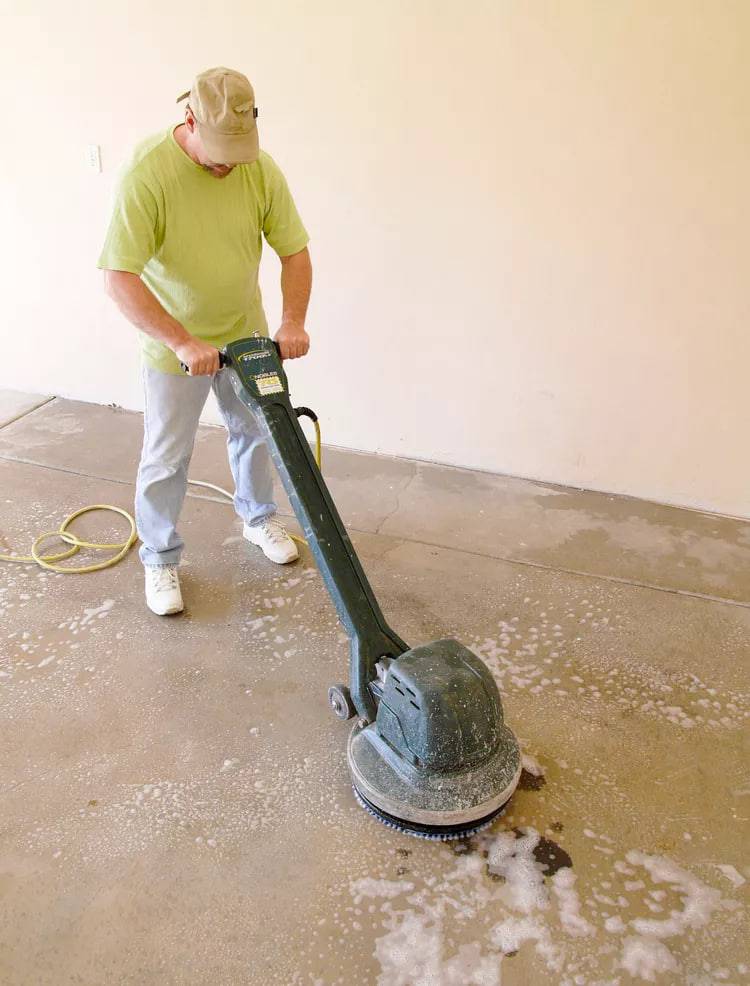
Now that we’ve tackled the loose debris and grime, it’s time for a more thorough cleaning:
- Dampen the Concrete: Use a hose to lightly wet the entire floor in small sections. A damp (not soaked) surface is ideal for optimal epoxy adhesion.
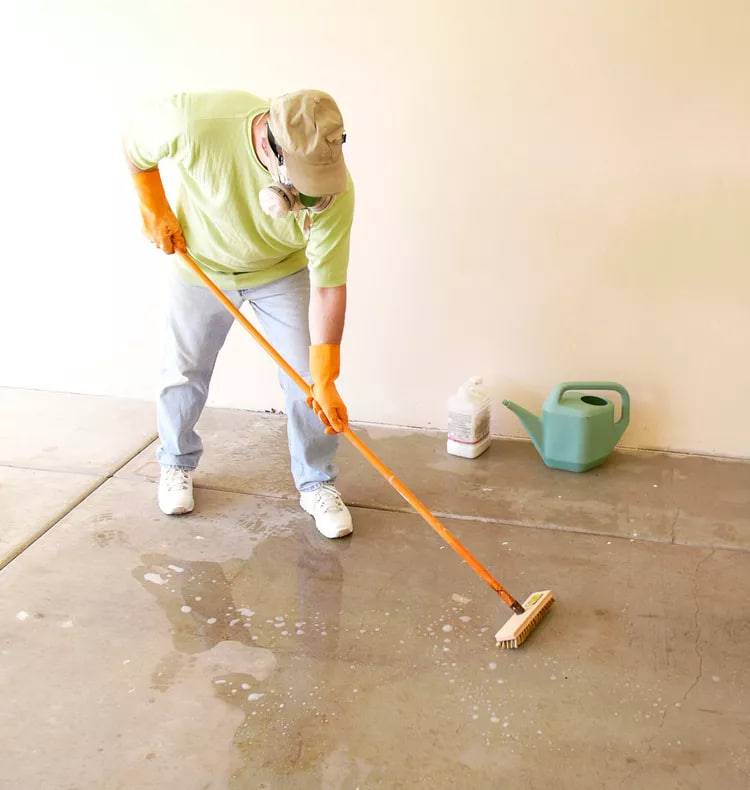
- Scrub-a-Dub-Dub: Working in manageable 5-foot squares, power scrub the floor with the degreaser solution and a brush attachment. Focus on those stubborn stains!
- Cornering the Dirt: For areas the power scrubber can’t reach (like corners and edges), switch to your trusty stiff-bristle brush and scrub away any remaining residue.
- Squeegee Savior: Once the entire floor is clean, use a rubber squeegee to pull the dirty water towards a central area.
- Wet-Vac Rescue: Here comes your wet-dry vac! Suck up the collected cleaning solution to leave the concrete floor squeaky clean.
Important Disposal Tip: Disposing of cleaning solutions can vary by region. Check with your local environmental office to see if flushing the solution down the toilet is acceptable. Otherwise, they can advise you on proper disposal methods.
Step 3: Acid Etching
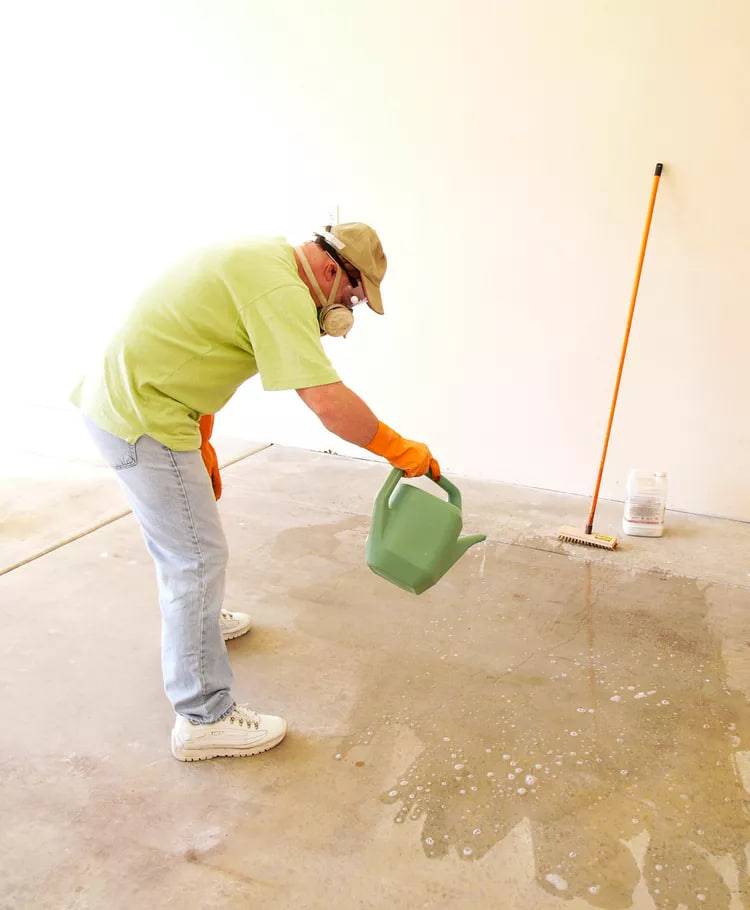
Important Note: This step is optional and may not be necessary for all epoxy applications. Always refer to your specific epoxy product’s recommendations. Muriatic acid is a strong acid that requires careful handling. If you choose to proceed, ensure proper safety measures are taken.
Safety First:
- Gear Up: Before handling any acid, wear a respirator with vapor protection to avoid inhaling harmful fumes.
Mixing the Solution:
- Water First: Pour a gallon of clean water into a plastic sprinkling can.
- Acid Measured Out: Wearing gloves and following the recommended ratio (typically 1 part acid to 10 parts water), carefully measure and pour 12 ounces of 32% muriatic acid into a separate container holding 15 cups of water. Adjust measurements proportionally for smaller or larger areas.
- Stir it Up: Using a paint stirrer, gently mix the solution in the sprinkling can for a few seconds to ensure it’s well combined.
Applying the Acid:
- Section by Section: Work in manageable 10×10 foot areas. Evenly sprinkle the acid mixture over the designated area using the sprinkling can.
Remember:
- Always prioritize safety when handling acid.
- Consult your epoxy product’s instructions to determine if acid etching is necessary.
Step 4: Scrubbing and Etching (Optional)
Safety Reminder: If you completed step 3 using muriatic acid, ensure proper ventilation is maintained throughout this step.
Scrubbing and Etching:
- Scrub-a-Dub-Dub (Round Two): Using your power scrubber with a brush attachment (or a long-handled acid brush if you opted to skip the rental), scrub the 10×10 foot section for 10 minutes. The goal is to create a slightly roughened surface for better epoxy adhesion.
- Repeat and Rinse: Continue working in sections, repeating the sprinkling with the acid mixture and scrubbing the floor until the entire surface is etched.
- Neutralize the Acid: Once everything is scrubbed, thoroughly rinse the floor three times with clean water to remove any residual acid. This is a crucial step to ensure proper epoxy adhesion.
- Drying Time: Allow the etched floor to dry completely overnight. Moisture can negatively impact the epoxy application, so patience is key!
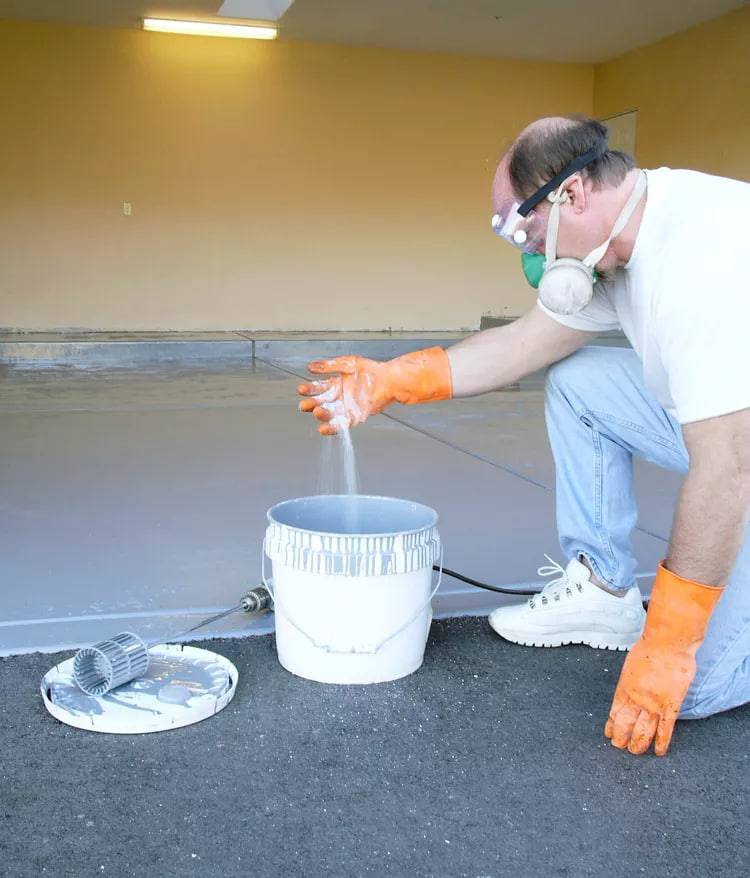
Step 5: Mixing the Epoxy Masterpiece
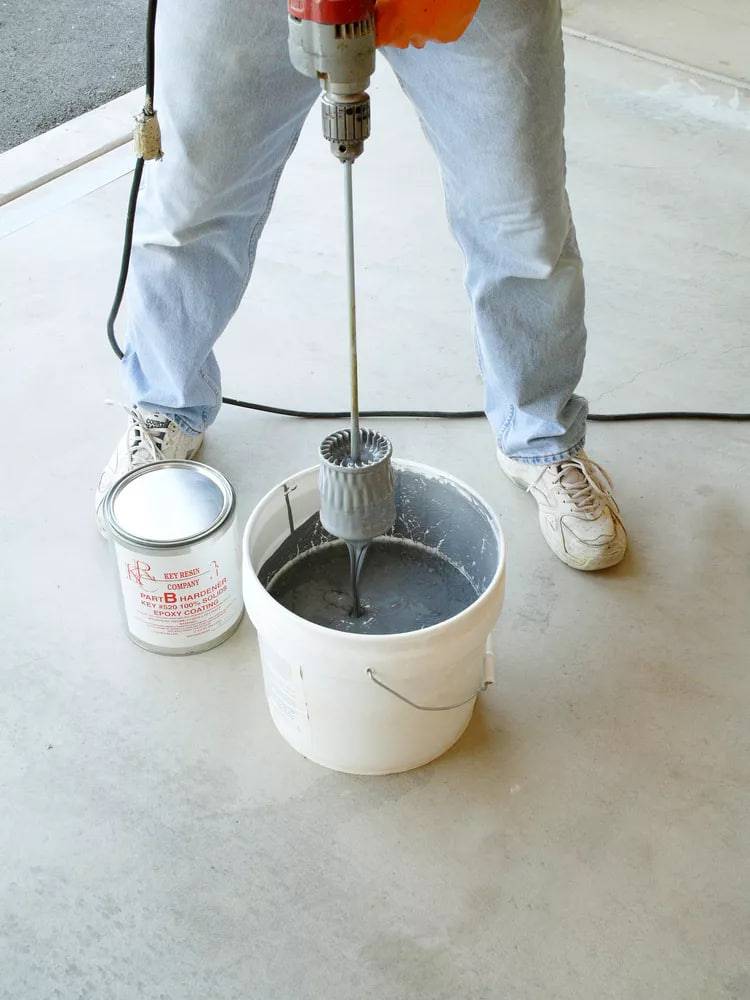
Now that the canvas is prepped, it’s time to mix the epoxy, the star of the show!
- Manufacturer Knows Best: Always refer to the specific instructions provided by your chosen epoxy product for the recommended mixing ratio and process.
- Double the Trouble (For Good Reason): Epoxy typically comes in two parts (resin and hardener). Following the recommended ratio, carefully pour both parts into a clean bucket.
- Power Up the Mixing Maestro: Using a drill equipped with a stirring bit, thoroughly mix the epoxy components for the specified time as directed by the manufacturer.
- Double Checking for Perfection: To ensure a uniform blend, carefully pour the mixed epoxy into a second clean bucket. Give it another power-mix with the drill for good measure. This step helps guarantee a flawless and consistent epoxy application.
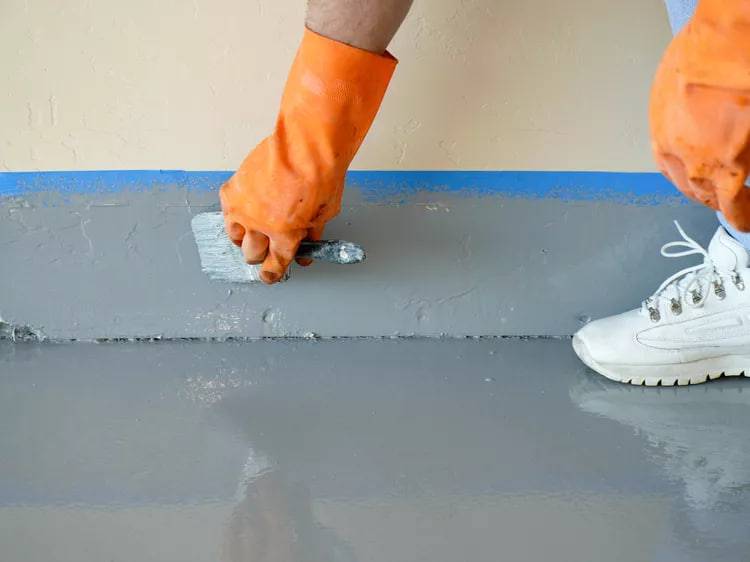
Step 6: Taming the Edges – Applying the Epoxy Perimeter
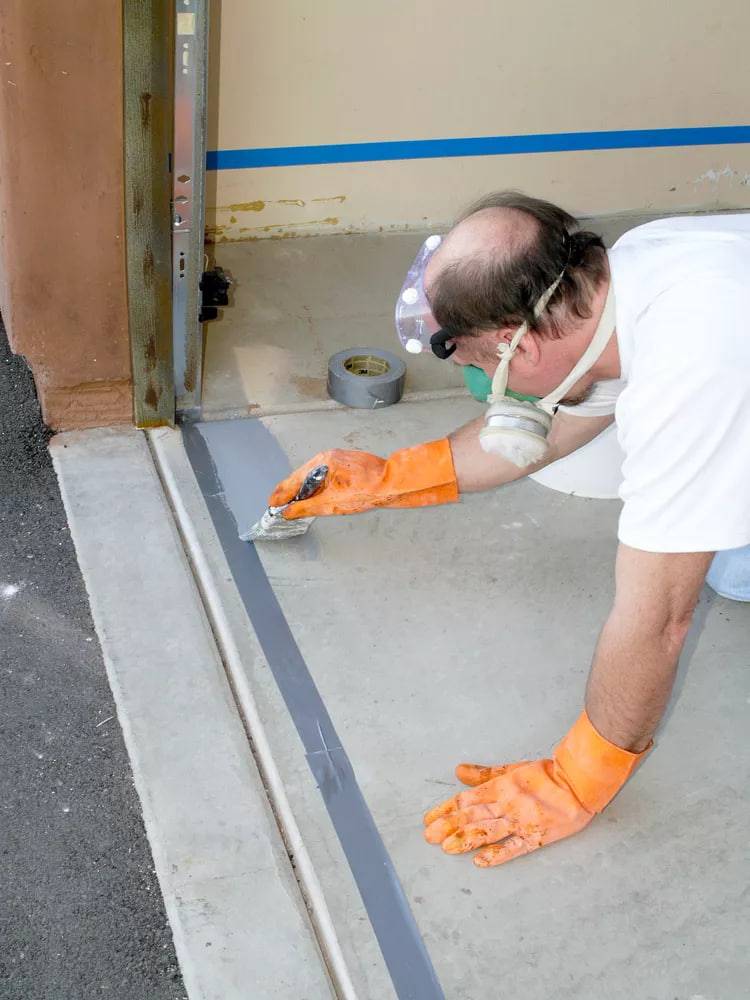
Before tackling the main floor area, let’s get those edges under control!
- Sealing the Deal (Optional): While not always necessary, some people like to use duct tape to create a clean line where the epoxy will meet the garage walls. Apply the tape directly beneath the garage door and along the wall base.
- Brushwork Basics: Using a paintbrush, apply a 4-inch strip of epoxy directly onto the taped area (or directly to the wall if you opted to skip the tape). This creates a clean and sealed edge between the epoxy floor and the wall.
Step 7: Laying Down the Epoxy – Rolling Like a Pro
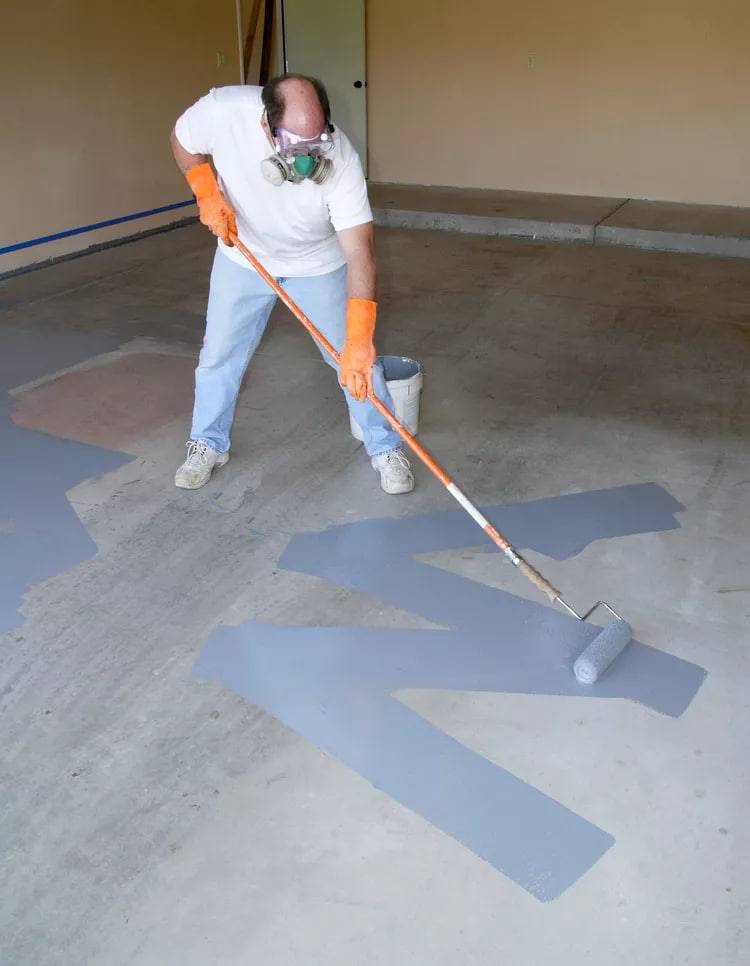
Now for the main event – applying the epoxy to the floor!
- Roll Out the Arsenal: Grab your 9-inch medium-nap roller and attach it securely to a pole for better leverage.
- Less is More: Dip the roller into the epoxy bucket, ensuring only the bottom half is coated. A saturated roller can lead to dripping and uneven application.
- W is for Winner: Work in manageable 4×4 foot sections. Pour a small amount of epoxy onto the floor within your designated section. Using the roller, apply the epoxy in a large “W” pattern.
- Backroll for a Flawless Finish: After applying the “W,” go back over the section with the roller in a straight back-and-forth motion to ensure even coverage and eliminate any roller marks.
- Maintaining a Wet Edge: As you move from section to section, ensure the edges of the previously applied epoxy remain wet. This helps create a seamless and uniform epoxy surface. A dry edge can result in visible seams upon drying.
- Drying Time is Key: Once you’ve completed the first coat, allow it to dry completely according to the manufacturer’s instructions. Patience is key here! Skipping the drying time can compromise the overall application.
Step 8: Doubling Up for Durability (and Maybe Some Flair)
The first coat is down, and now it’s time for the second! This coat adds extra strength and can also be customized for additional grip or aesthetics.
- Glossy or Grippy? The Choice is Yours: Epoxy floors are known for their shine, but they can also be slippery when wet. If you prefer a less slippery surface, now’s the time to incorporate a non-skid floor coating into the epoxy for the second coat.
- Mixing in the Magic: Following the manufacturer’s instructions for the non-skid additive, use your drill and stirring bit to thoroughly incorporate it into the epoxy mixture for the second coat.
- Roll and Repeat: Grab your roller and repeat step 7, applying the second coat of epoxy using the same “W” pattern and backrolling technique to ensure a smooth finish.
- Flake It Up (Optional): Feeling creative? If you want to add color flakes for a decorative touch, sprinkle them lightly over the floor while the second coat is still wet. Gently distribute the flakes to create your desired pattern. You can add more flakes until you’re happy with the look.
- Drying Time – Round Two: Once you’ve completed the second coat (with or without flakes), let it dry completely according to the manufacturer’s instructions. Remember, proper drying is crucial for a flawless and durable epoxy floor.
Step 9: The Finishing Touches – Sealing the Deal
Almost there! Here’s how to add a polished touch and extra protection to your newly transformed epoxy floor:
- Baseboard Bliss (Optional): If you want to create a truly finished look and add an extra layer of protection to your walls, you can paint the bottom 4 inches of the garage or basement wall with the leftover epoxy mix used on the floor. Apply masking tape to the wall section you want to paint to ensure clean lines. Once you’ve finished painting the epoxy baseboard, carefully remove the masking tape.
- Letting it All Cure: Congratulations! You’ve completed the application process. Now comes the waiting game. Resist the urge to walk on your new floor – allow the epoxy to cure completely according to the manufacturer’s instructions. This typically takes at least 24 hours, but some epoxies may require longer curing times.
Enjoying Your New Epoxy Floor:
Once fully cured, your epoxy floor is ready for action! You’ll be rewarded with a durable, easy-to-clean surface that will enhance your garage or basement for years to come. For long-lasting results, avoid using harsh chemicals or abrasive cleaners on your new epoxy floor. Regular sweeping, mopping, and spot cleaning with a mild detergent solution will keep your floor looking its best.
Conclusion
Transform your garage or basement into a sleek and functional space with a stunning epoxy floor! This durable and easy-to-clean coating is a perfect choice for high-traffic areas, offering superior resistance to scratches, chemicals, and even dropped tools. Unlike paint, epoxy forms a rock-solid bond with concrete, creating a seamless and long-lasting finish that can endure for up to 20 years with proper care.