
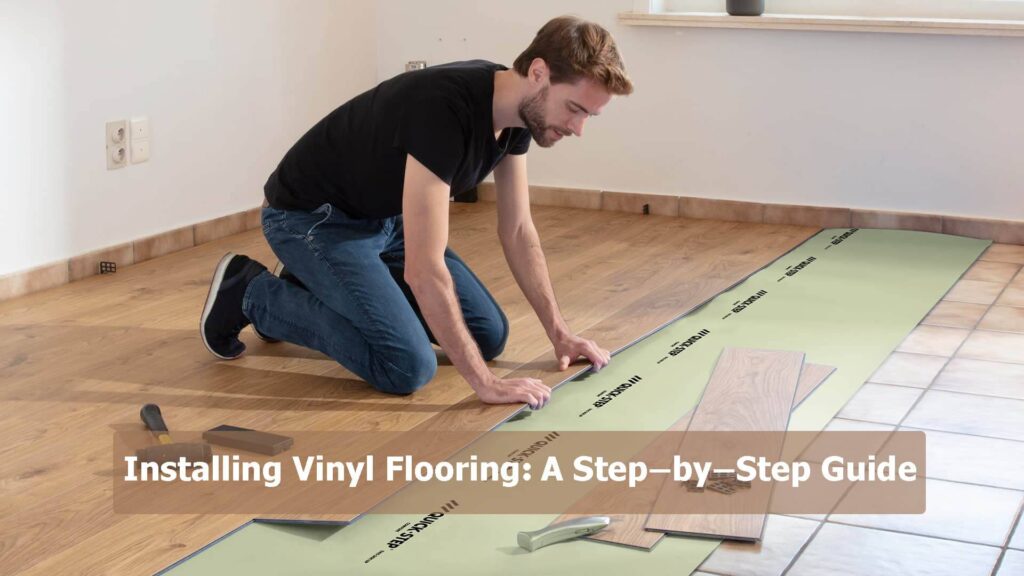
For homeowners looking for a stylish and low-maintenance flooring option, vinyl flooring is a popular choice due to its versatility, durability, and affordability. Although professional installation is always an option, many DIY enthusiasts are enthusiastic about taking on this project themselves. Whether you’re a seasoned DIYer or a curious novice, this comprehensive guide will walk you through the process of installing vinyl flooring from start to finish, ensuring a seamless transition from old to new.
Gathering Your Tools and Materials
Before embarking on your vinyl flooring adventure, it’s crucial to have all the necessary tools and materials at your disposal. This includes:
- Measuring tape: A trusty companion for accurately determining the dimensions of your room and cutting planks to size.
- Utility knife: Your go-to tool for precision cutting of vinyl planks, underlayment, and expansion gap filler.
- Circular saw (optional): If you encounter obstacles like door thresholds or baseboards, a circular saw will be your lifesaver.
- Utility scissors: For cutting around corners and other intricate shapes.
- Grout float or trowel: The perfect tool for smoothing out expansion gap filler and achieving a professional finish.
- Vinyl flooring planks: The star of the show, these planks will transform your space with their diverse styles and patterns.
- Expansion gap filler: This essential product ensures that your vinyl flooring has room to expand and contract, preventing unsightly gaps and potential damage.
- Underlayment material: A layer of padding that provides a smoother base for your flooring, enhances sound insulation, and adds a touch of warmth.
- Knee pads (optional): These will save your knees from the discomfort of prolonged kneeling during installation.
Preparing Your Floor for Vinyl Bliss
Before you begin laying your vinyl planks, it’s essential to prepare your subfloor to ensure a smooth and durable installation. This involves:
- Removing Old Flooring: Carefully remove any existing flooring, disposing of it appropriately. If the subfloor is uneven, consider using plywood or self-leveling compound to achieve a flat surface.
- Checking for Moisture: Vinyl flooring is susceptible to moisture damage, so it’s crucial to ensure your subfloor is completely dry. Use a moisture meter to check for dampness, and if necessary, let the subfloor dry completely before proceeding.
- Laying Down Underlayment: Spread the underlayment material evenly across the subfloor, ensuring its smooth and free from wrinkles or bumps. Adhere the underlayment to the subfloor using double-sided tape or adhesive, leaving expansion gaps around the perimeter and at doorways.
Laying the Foundation for Your New Flooring
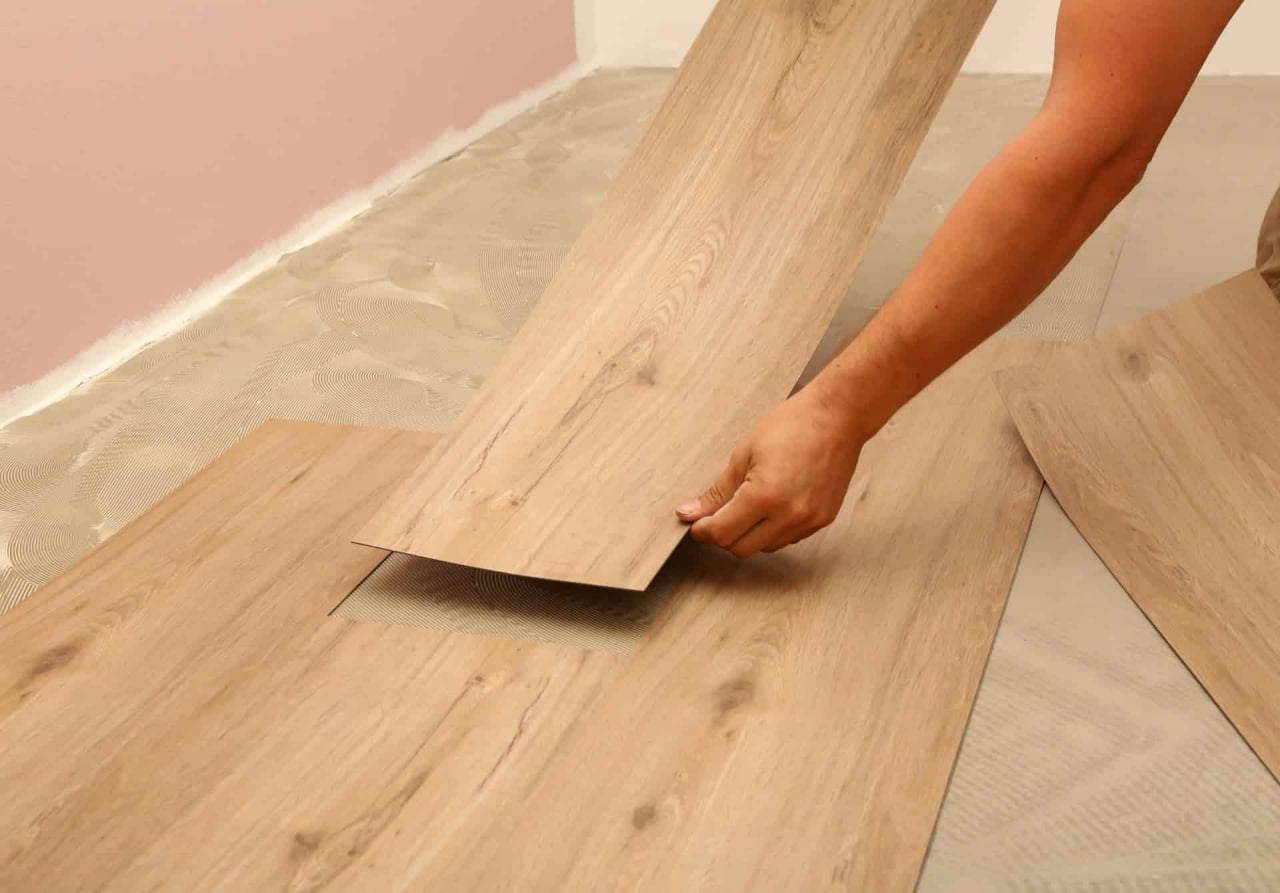
Once your subfloor is prepared, it’s time to start laying your vinyl planks. Follow these steps:
- Planning the Installation Sequence: Decide on the starting point and work your way towards the entrance to avoid tripping over loose planks. Leave expansion gaps around walls, obstacles, and doorways.
- Cutting the Starting Plank: Measure the width of the room and add the width of the expansion gap to determine the length of the starting plank. Use a utility knife or circular saw to cut the plank to size.
- Laying the First Plank: Align the first plank with the starting wall, leaving a small expansion gap. Carefully press the tongue of the plank into the groove of the preceding plank, ensuring a tight fit.
- Installing Subsequent Planks: Continue laying planks in a staggered pattern, overlapping the tongues of the planks. Use a tapping block and mallet to secure the planks firmly.
- Cutting and Installing End Planks: Measure and cut the end planks to fit around obstacles or doorways. Install the end planks using the same techniques as for the starting and subsequent planks.
- Applying Expansion Gap Filler: Fill the expansion gaps around the perimeter and at doorways with expansion gap filler. Use a grout float or trowel to smooth out the filler and ensure a seamless transition between the floor and walls.
- Allowing the Filler to Cure: Follow the manufacturer’s instructions for drying and curing the expansion gap filler.
The Finishing Touches: Adding Sparkle to Your Flooring
Once the filler has cured, it’s time to complete your vinyl flooring project with these finishing touches:
- Removing Grout Float Marks: Use a damp sponge to gently remove any grout float marks from the vinyl surface.
- Deep Cleaning and Buffing: Thoroughly clean the vinyl flooring with a mild detergent and water solution. Use a soft mop or cloth to avoid scratching the surface. Buff the surface with a clean, dry cloth to enhance the shine and protect the finish.
- Reinstalling Baseboards: Carefully reinstall your baseboards, ensuring they are flush with the new flooring. Use a finishing nailer or brad nailer to secure them firmly.
- Replacing Thresholds: If necessary, replace any thresholds that were removed during the installation process. Make sure the new thresholds are compatible with the vinyl flooring and properly seal the transition between the flooring and other surfaces.
- Enjoy Your New Flooring: Step back and admire your handiwork – your space is now transformed with a stylish, durable, and low-maintenance flooring that will enhance its look and feel for years to come. Congratulations on successfully tackling this DIY project!
Conclusion: Your Transformational Vinyl Flooring Adventure
Congratulations on completing your DIY vinyl flooring adventure! You’ve transformed your space with a versatile, durable, and low-maintenance flooring option that will add years of beauty and comfort to your home. With careful planning, methodical execution, and a touch of DIY spirit, you’ve successfully navigated the process, leaving behind a stunning new floor that reflects your personal style and commitment to home improvement.
As you step back and admire your handiwork, take pride in the knowledge that you’ve not only enhanced your living space but also honed your DIY skills. Embrace the satisfaction of transforming your home with your own hands, and consider embarking on future DIY projects with renewed enthusiasm and confidence.
Remember, vinyl flooring is a forgiving material that requires minimal maintenance. With proper care and attention, your new flooring will continue to look its best for years to come. So, relax, enjoy the fruits of your labor, and relish the transformation you’ve brought to your home. Your vinyl flooring adventure has just begun!
FAQs
Q: What tools and materials do I need for installing vinyl flooring?
A: You will need the following tools and materials for installing vinyl flooring:
- Measuring tape
- Utility knife
- Circular saw (optional)
- Utility scissors
- Grout float or trowel
- Vinyl flooring planks
- Expansion gap filler
- Underlayment material
- Knee pads (optional)
Q: What should I do to prepare my subfloor for vinyl flooring?
A: Before you start laying vinyl planks, it is essential to prepare your subfloor to ensure a smooth and durable installation. This involves:
- Removing any existing flooring
- Checking for moisture damage
- Laying down underlayment
Q: What is the best way to install vinyl planks?
A: There are two main methods for installing vinyl planks:
- Manual installation: This method involves using click-together planks that snap together easily.
- Glue-down installation: This method involves using adhesive to secure the planks to the subfloor.
Q: How long does it take to install vinyl flooring?
The time it takes to install vinyl flooring will vary depending on the size of the room and your experience level. However, most DIY enthusiasts can expect to complete the project in a few days.
Q: What are some of the benefits of installing vinyl flooring?
Vinyl flooring has many benefits, including:
- Durability: Vinyl flooring is a very durable material that can withstand heavy traffic.
- Water resistance: Vinyl flooring is water-resistant and can be easily cleaned with a damp mop.
- Low maintenance: Vinyl flooring requires minimal maintenance.
- Affordable: Vinyl flooring is a relatively affordable flooring option.
- Variety: Vinyl flooring comes in a variety of styles and colors to suit any taste.
Q: What are some of the challenges of installing vinyl flooring?
There are a few challenges that you may encounter when installing vinyl flooring, including:
- Proper measuring and cutting: It is important to measure and cut the planks carefully to ensure a seamless installation.
- Leveling the subfloor: The subfloor must be level for the vinyl planks to lay flat.
- Expansion gaps: It is important to leave expansion gaps around the perimeter of the room to allow the flooring to expand and contract.
Q: Can I install vinyl flooring over existing flooring?
In general, it is not recommended to install vinyl flooring over existing flooring. However, there are some cases where it may be possible. If you are unsure about whether or not you can install vinyl flooring over your existing flooring, it is best to consult with a professional.